Water Cycle
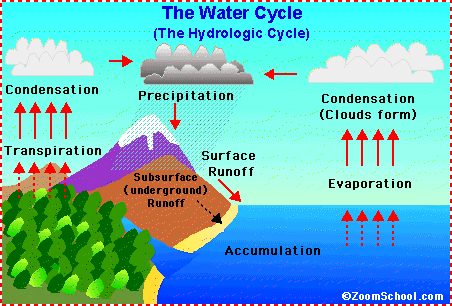
We have learned that water exists in three states of matter. It can be solid ice, liquid, or gas steam. The term "water cycle" refers to how water moves in our environment. The picture below shows how water moves through the water cycle. Read the Water Cycle Vocabulary Page to understand the diagram below.
Col, Jeananda. Zoom Astronomyhttp://www.enchantedlearning.com/subjects/astronomy/planets/earth/Watercycle.shtml 1999
Liquid water accumulates in rivers, lakes, and oceans. The hot sun causes the water to evaporate, as water vapor a gas. As the water vapor rises it gets cooler causing it to condense into water droplets that form clouds. When the water droplets get heavy enough the water falls back to the ground as rain, snow, ice, or hail. This is precipitation. When water from precipitation collects in the ground it is absorbed by the roots of plants. Transpiration occurs when water vapor is released from plants into the air. Water that does not collect in the ground runs off from the and flows back into rivers, lakes, and oceans. The sun heats the water and the water cycle begins again.
Water Cycle in Action
How can we see this process in action? We can build a Water Cycle Experiment in a plastic bottle.
Here is what you need:
Plastic 2 liter bottle
Measuring cup
1 1/2 cups of water
1 cup of sand or small aquarium rocks
4 small rocks or large seashells (Anything to hold the bottle in placed and keep it from rolling.)
Permanent marker
Observation Page
Ask an adult to use a hammer and nail to poke a hole into the lid of the bottle.
1. Fill the bottle with 2 cups of sand or aquarium rocks.
2. Measure 1 1/2 cups of water and pour it into the bottle
3. Tip the bottle on its side so that the water forms a pool in front of the
rocks.
4. Put the bottle in the sun on its side and prop it so that it won't roll. Put
the lid on the bottle.
5. Form a Hypothesis to predict what will happen to the water.
6. Mark the water level on side of the bottle with the marker.
7. Leave the bottle in the sun for several days. Draw pictures of what
you see.
Have fun observing the water cycle in action!
Here is a great interactive Water Cycle diagram from the Environmental Protection Agency. When you are finished click your back button to return to this site.
Go to Water Cycle Vocabulary or Home
